Circles and Lines
The April round consists of a plain border with a graphic .5” line, set off with circle cornerstones. The border will finish at 4” wide.
Before you start, make sure your quilt top is currently 28.5” square.
Reverse Circle Cornerstones
This technique requires a fair amount of prep work, but it’s a reliable way to make a perfect circle—and there is no topstitching, which gives a clean look.
Fabric:
Special tools:
Steps:
1. Cut a 4.5” square from freezer paper, using paper scissors. Fold square in half lengthwise and crosswise, and crease to find the center.
2. Mark a 3.5” circle in the center of the square using a compass or template. Cut out the circle and set aside.
3. Grab one of your 5” background fabric squares. Press the shiny side of the freezer paper to the wrong side of background fabric. The paper will stick to the fabric.
4. Trim away the fabric on the inside of the circle, leaving about .5” seam allowance. (It doesn’t have to be exact.)
5. Snip the seam allowance in .5” increments all around the circle. Don’t cut the paper! Then press the tabs to the paper side, making sure they’re flat and firm against the freezer paper. It should look sort of like a flower.
6. Put a drop of glue on the outside of each tab. With right sides up, center the background fabric over the circle fabric. Let the glue dry.
7. Carefully remove the freezer paper from the background fabric. Re-press if needed.
8. Sewing time! Using the zipper foot, sew along the fold line, with the circle fabric on the bottom. Hold the top piece perpendicular to the foot as you sew. Go slow and maintain an even curve.
9. Press. Trim seam allowance to .25”. Trim the block to 4.5”
10. Repeat to make four blocks.
Lined Border
Fabric:
(Or just cut strips the length of fabric and trim after they’re sewn.)
Steps:
1. Sew a strip of line fabric to a strip of background fabric, with right sides together and using a .25” seam allowance. Press toward background.
2. Sew a strip of background fabric to the line fabric, as above. Press toward background.
3. Repeat to make 4 borders. Trim to 28.5”.
Attaching the Borders
1. Sew two of the borders to opposite sides of the quilt top, using a .25” seam allowance.
2. Sew cornerstones to the ends of the other two border strips.
3. Attach the cornerstone borders to the quilt top.
Your quilt should now measure 36.5” square.
Alternatives:
 |
The April round consists of a plain border with a graphic .5” line, set off with circle cornerstones. The border will finish at 4” wide.
Before you start, make sure your quilt top is currently 28.5” square.
Reverse Circle Cornerstones
This technique requires a fair amount of prep work, but it’s a reliable way to make a perfect circle—and there is no topstitching, which gives a clean look.
Fabric:
- Four 5” squares of background fabric
- Four 4.5” squares of feature fabric for circles
Special tools:
- freezer paper
- paper scissors
- a compass or template for a 3.5” circle
- fabric glue (or regular glue)
- zipper foot
Steps:
1. Cut a 4.5” square from freezer paper, using paper scissors. Fold square in half lengthwise and crosswise, and crease to find the center.
2. Mark a 3.5” circle in the center of the square using a compass or template. Cut out the circle and set aside.
3. Grab one of your 5” background fabric squares. Press the shiny side of the freezer paper to the wrong side of background fabric. The paper will stick to the fabric.
4. Trim away the fabric on the inside of the circle, leaving about .5” seam allowance. (It doesn’t have to be exact.)
 |
| You're basically making a floppy disk. |
5. Snip the seam allowance in .5” increments all around the circle. Don’t cut the paper! Then press the tabs to the paper side, making sure they’re flat and firm against the freezer paper. It should look sort of like a flower.
 |
| These tabs aren't actually flat enough. Steam helps! |
6. Put a drop of glue on the outside of each tab. With right sides up, center the background fabric over the circle fabric. Let the glue dry.
 |
| Regular fabric glue works better than a glue stick. |
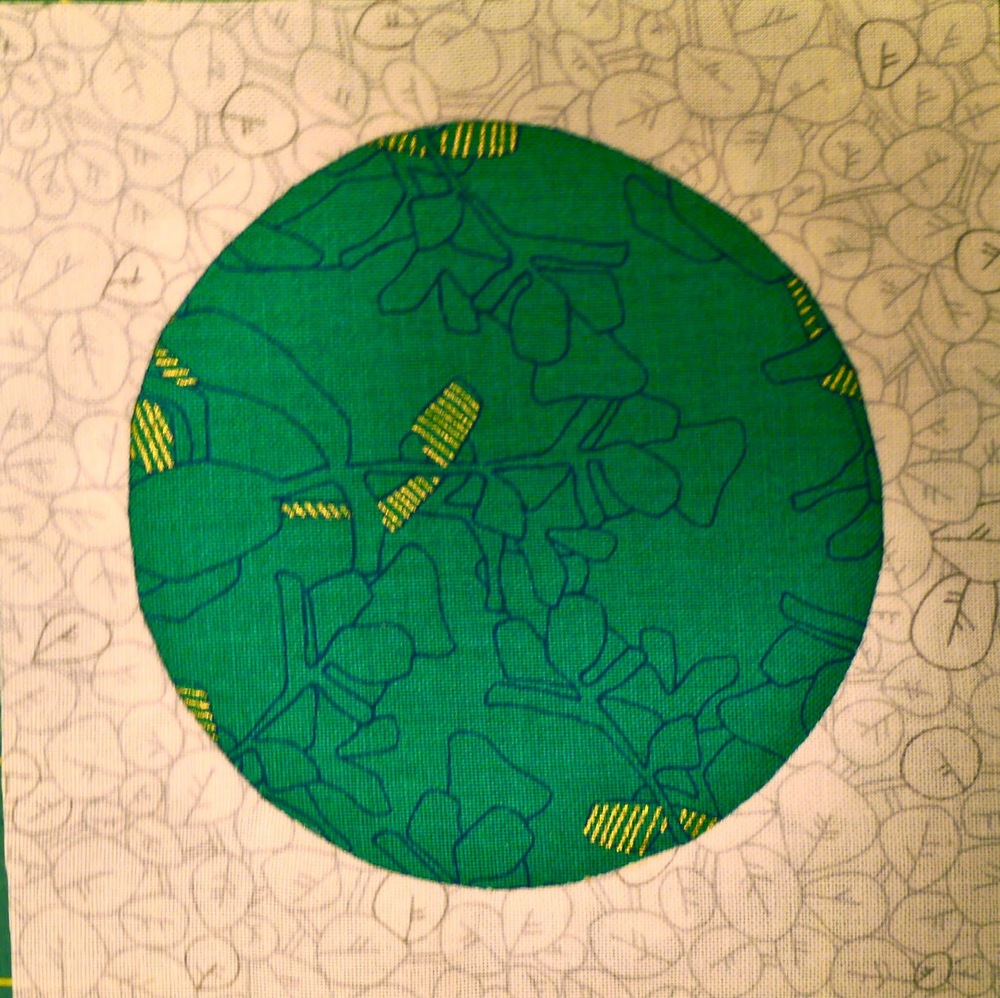
7. Carefully remove the freezer paper from the background fabric. Re-press if needed.
 |
| It's all coming together now. |
8. Sewing time! Using the zipper foot, sew along the fold line, with the circle fabric on the bottom. Hold the top piece perpendicular to the foot as you sew. Go slow and maintain an even curve.
 |
| The moment of truth! |
9. Press. Trim seam allowance to .25”. Trim the block to 4.5”
10. Repeat to make four blocks.
 |
| No stitching shows! |
Lined Border
Fabric:
- Eight strips of background fabric, 2.25” wide x 29” long
- Four strips of line fabric, 1” wide x 29” long
(Or just cut strips the length of fabric and trim after they’re sewn.)
Steps:
1. Sew a strip of line fabric to a strip of background fabric, with right sides together and using a .25” seam allowance. Press toward background.
2. Sew a strip of background fabric to the line fabric, as above. Press toward background.
3. Repeat to make 4 borders. Trim to 28.5”.
Attaching the Borders
1. Sew two of the borders to opposite sides of the quilt top, using a .25” seam allowance.
2. Sew cornerstones to the ends of the other two border strips.
3. Attach the cornerstone borders to the quilt top.
Your quilt should now measure 36.5” square.
|
| So purty! |
Alternatives:
- Use a different technique to make the circle cornerstones—regular or raw-edge applique would work
- Add an applique circle to the center of each border
- Make plain cornerstones
Have fun!